DIY Testing the Effectiveness of Sound Absorbing Materials
-

- Feb 22, 2021

What happens if you develop an idea, but take too long to bring it to fruition? Chances are your concept will either die or someone else will bring it to market first. We all hate waiting on external validation of ideas that we truly believe will work.
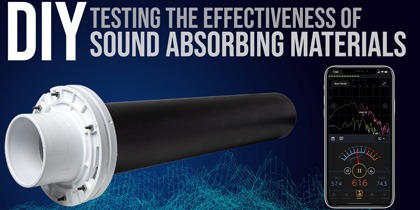
In this post, we're going to try something different. Rather than sending different materials off to test their impact on sound absorption, we're going to develop a decibel meter test in-house that anyone could do. We're going to take you through this step-by-step. This may be a rough test, but if you start if you begin noticing an obvious difference in sound reduction between two materials, chances are you're probably on to something.
Purpose of this Test
This test cost us roughly $25, and we can use it whenever we want. I can tell you that testing in the United States for an official materials comparison on sound would cost approximately between $1,000 - $2,000. This DIY test is a much cheaper alternative for some simple benchmarking.
Another reason for this test is because, in today's world, speed is everything. We wanted to put this test method together as it's a quick and simple way of testing how much of an impact a simple change of material or product design can make with noise reduction.
Is this test perfect? No, but it's gonna give the general sense of what works better, and that's what we can use to take an idea from ideation to the justification and approval stages.
With all this said, let's get started!
Supplies Used During this Test
Building Materials

4" PVC Pipe (2ft Long)

Flange Plates (x2)

Seal (Optional)

Metal Plate (Optional)
You may also need:
- Nuts/Bolts or Clamps
- Foam Board
- Hot Glue or Tape
- Spray paint to make it look more official
We're gonna throw two options out here for you. You can either purchase a decibel meter, like the one shown here, which a lot of them are actually relatively cheap, or you can also use decibel meter apps.
A couple of apps we discovered were:
- Decibel X: 3-day free trial, followed by $4.99 / month or $29.99 / year
- dB Meter: 3-day free trial, followed by either $7.99 / month or $29.99 / year


Sound Measurement
In order to perform a test, we're going to need a way of producing a sound that will travel through the tube through the material you're testing towards the decibel meter.
You can achieve this in a few different ways. We suggest either using a small speaker or at the very least, using your cell phone. We recommend avoiding using larger speakers where sound waves will spill over the tube, impacting the test effectiveness.

Sound Source / Device
Assembly Instructions:
Step 1: Add Seal to Both Flange Plates
While this may not be 100% necessary, it's a good way of holding the disk in place and providing a better sealing barrier for better results.
We used an extruded gasket that has adhesive on the back that was leftover from a past project, but you can either cut a rubber sheet to size or find some sort of adhesive foam strip.

Step 2: Add the Plate
We used a 4.75" (outside diameter) metal plate with a hole in the middle that we had waterjet cut to match the size of the plugs we wanted to test out.
The plate is optional based on what you're testing. So, if you're testing 2 different foam mats, you most likely just need to cut the mats to size, and not worry about using a plate. We specifically used a metal plate here because of the application the plugs were being used in (i.e. Automotive panel plugs being used on metal panels)

Step 3: Fastening the Flange Plates Together
Next, you'll need to fasten the flange plates together. We used nuts and bolts (sizing is based on the hole sizes on the flange plates), but there are several other ways to ensure these hold together, such as clamps or tape

This step is self-explanatory. You just need to install the PVC pipe onto one of the flange plates. The 4" pipe we used was 2ft long.
The pipe is used to direct the sound towards the material and decibel meter.

Step 4: Add the PVC Pipe
The speaker and your phone or decibel meter's locations are CRUCIAL for this test to work correctly. In order to place both at the exact same spot each time, we used foam board and cut out pieces on both ends, which included an opening for the speaker and an opening for the mic/cell phone.
In order to keep both in place on the testing unit, we used hot glue and tape. This instruction is completely dependent on the speaker and mic you use.
Once complete, your assembly is ready to go!

Step 5: Speaker and Mic Placement
How to Perform Test
Step 1: Sound Source and Placement
For this test, we simply hooked a speaker up to our laptop (or phone) and placed the speaker in a spot that it would consistently be at for each test.
For the sound, we're used white noise as it is produced by combining all the different frequencies of sound together at once and gave us more consistency.
We preferred using the mobile apps for this test due to the easy useability to average out the results and easily export the data. You'll need to place the decibel meter at the exact same point each test, including the height of where it's placed.
For our test, to make it as easy as possible, we placed the phone directly into the PVC pipe and used tape for alignment marks.

Step 2: Placing Decibel Reader
We need to first get a read for what level the decibel meter reads without any material blocking / absorbing the sound. If you go with the white noise we chose, we recommend starting from the begging to start the reading and stopping the test approximately 10-15 seconds in so that you can average out the results
It's finally time to collect some data! You now want to install the material you're wanting to test. If you're testing a generic material, you'll just want to cut an approximately 4.75" circular sample to install in between the flange plates.
Or if you're performing a test like the one we did with panel plugs (shown in the image), you'll just need to install them. After that, go ahead and repeat the exact same test following the previous instructions above.

Step 3: Perform Test Without Any Material
Step 4: Add Material and Repeat Test
And there you have it! Shown below are screenshots of what results may look like (depending on what decibel meter method you chose). This was great way of being able to display what impact a material has when it comes to sound absorption. With that said, please keep in mind that this an easy and cheap way of performing a test. Results may not be super accurate, which is why we recommend using professional 3rd party testing

Key Items to Remember for Consistant Testing
We're gonna keep this simple, but we can't stress enough just how important this section is for accurate testing
- Decibel Meter Mic Placement: This is one of the most critical areas to pay attention to, as we learned the hard way. You must find a way of placing the mic at the exact same location every single time. And don't try holding it up using your hands. Having the mic just 1cm inside the tube vs. 1 centimeter outside makes a huge difference
- Noise Source: On top of the placement being just as critical as the decibel meter location, you also need to find a way of producing the exact same sound at the exact same sound level.
- Test Location: Find a spot at your facility or home that you can perform these tests with limited to no external sounds that could impede the test results.
- Product Design: If you're testing different products, keep in mind that the design and thickness are going to impact the results. So, if you're trying to see the difference between materials, then you'll need to use the exact same design
Conclusion
Is this test going to be the definitive method of making your final decision? Probably not. But is it something you can use on the fly to assist you in justifying your new idea? Absolutely.
The key here is honestly just going to come down your testing methods and using best practices. If you're measuring the same sound but your mic is in a different spot, then you're obviously going to see a difference in the data.
You May Also Like...